Classes 10–12 (F): Stripe, in test mode
Part of the task-app setup for Classes 10–12. Work through the parts in order, doing every step yourself; Start here has the worksheet, the screenshot log, how to ask Claude when you’re stuck, and the list of all parts.
Time: about 10–20 minutes.
As of Oct 22, 2026 · Official docs: Stripe · Stripe sandboxes · Stripe API keys · Stripe subscriptions · Stripe customer portal · Supabase Vault · Supabase: Edge Function secrets
Stripe handles the app’s monthly “Premium” subscription. Everything here is in test mode (Stripe calls it a sandbox): no real money moves, and you pay with test card numbers.
Get a Stripe account, with its sandbox. A sandbox is a practice copy of a Stripe account, with pretend money. While you’re in one, a dark bar across the top says “You’re testing in a sandbox”. Each Stripe account comes with one sandbox, and you do every Stripe step in it.
Go to dashboard.stripe.com/register and sign up with your email, your name, your country and a password, then confirm your email address. If Stripe asks for a business or account name, type the name of your other projects, for example
task-app-2026-maria.Make a new account for this app, so that it starts empty. Sign in at dashboard.stripe.com, click your account’s name at the top left, point at Create, and click Create account. Click Create a separate account, then Next. Type the Account name, for example
task-app-2026-maria, choose your Country of operation, and click Create.Screenshots: a new account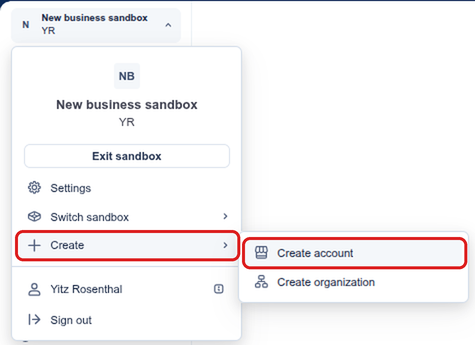
Your account’s name › Create › Create account 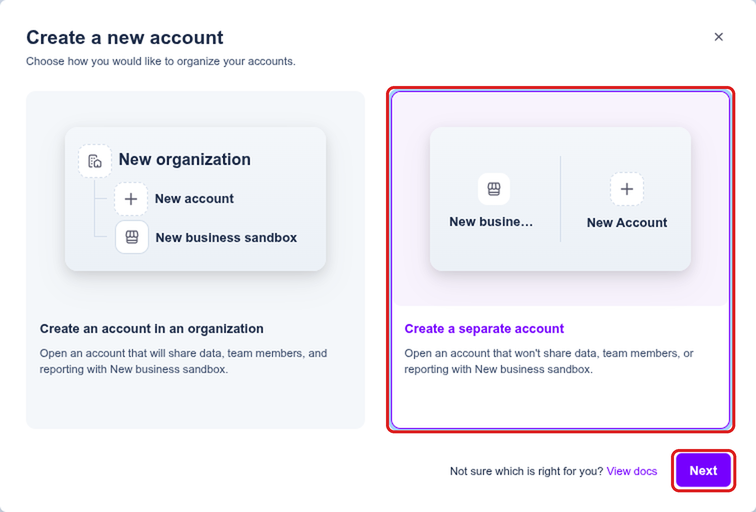
Create a separate account, then Next 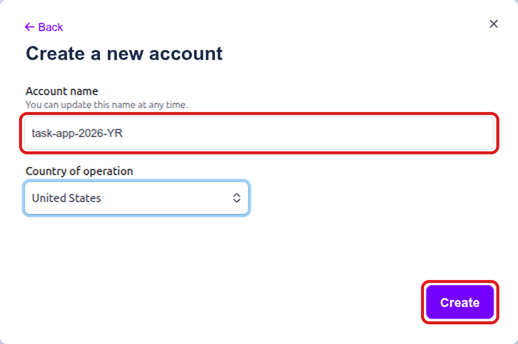
The account’s name and country Stripe then asks a few setup questions. This app needs none of them:
- Welcome to Stripe (business name and location): your account’s name is filled in. Click Continue.
- Describe your business and What do you need to get started?: click Skip.
- Choose how to set up Stripe: keep Set up in the Dashboard and click Continue.
- Get started in your sandbox: click Go to sandbox.
- A purple box, Next, verify your account: click Got it.
You’re now in the sandbox: the dark Sandbox bar is at the top, and your account’s name is at the top left. Stripe keeps offering to verify your business or activate payments, which asks for your Social Security number and bank details. Skip it: that’s only needed to take real money.
Screenshot: the last setup question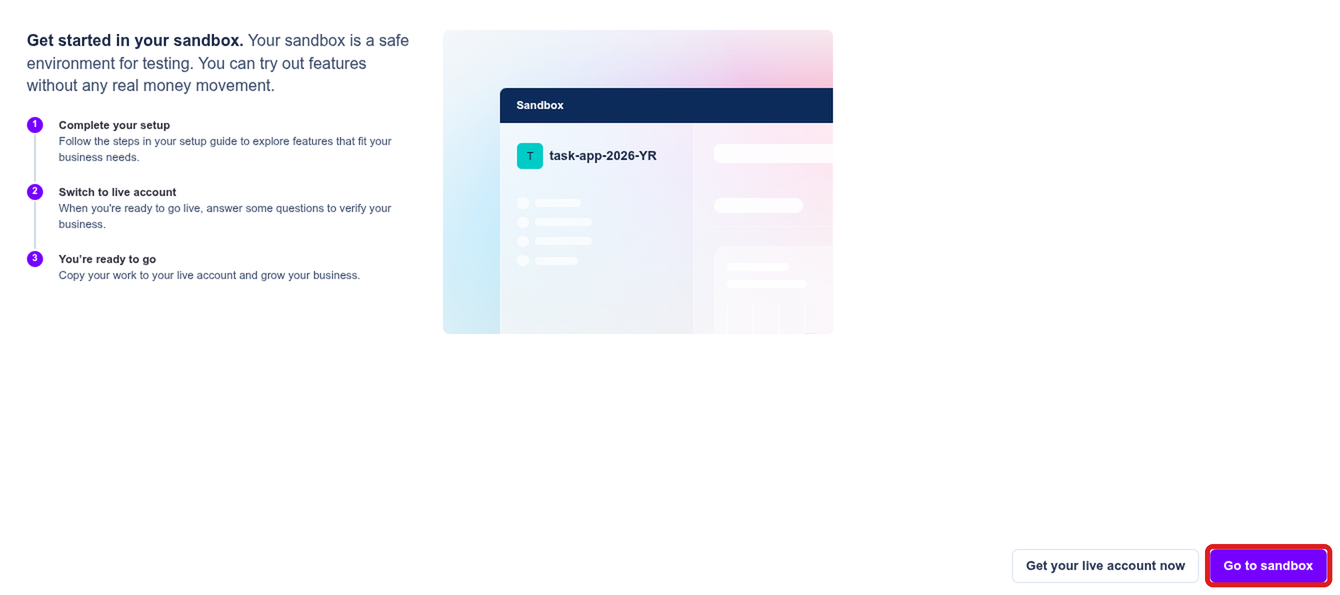
Get started in your sandbox: click Go to sandbox Copy the API keys. On the sandbox’s Home page, the API keys box at the right shows a Secret key (
sk_test_...) and a Publishable key (pk_test_...). Each shows only its start and end, but the copy icon next to it copies the whole key. Paste each one into the worksheet’s My Info sheet: Publishable key (test mode) and Secret key (test mode). (Go to API keys, in the same box, opens the full API keys page, with the same copy icons.)The secret key can do anything in your Stripe account, so it only ever goes to servers (here, Supabase), never into the app’s web pages or into Claude’s chat. The publishable key is made to be seen, in web pages; this app doesn’t use it, because it sends users to Stripe’s own checkout page.
Screenshot: the API keys on the Home page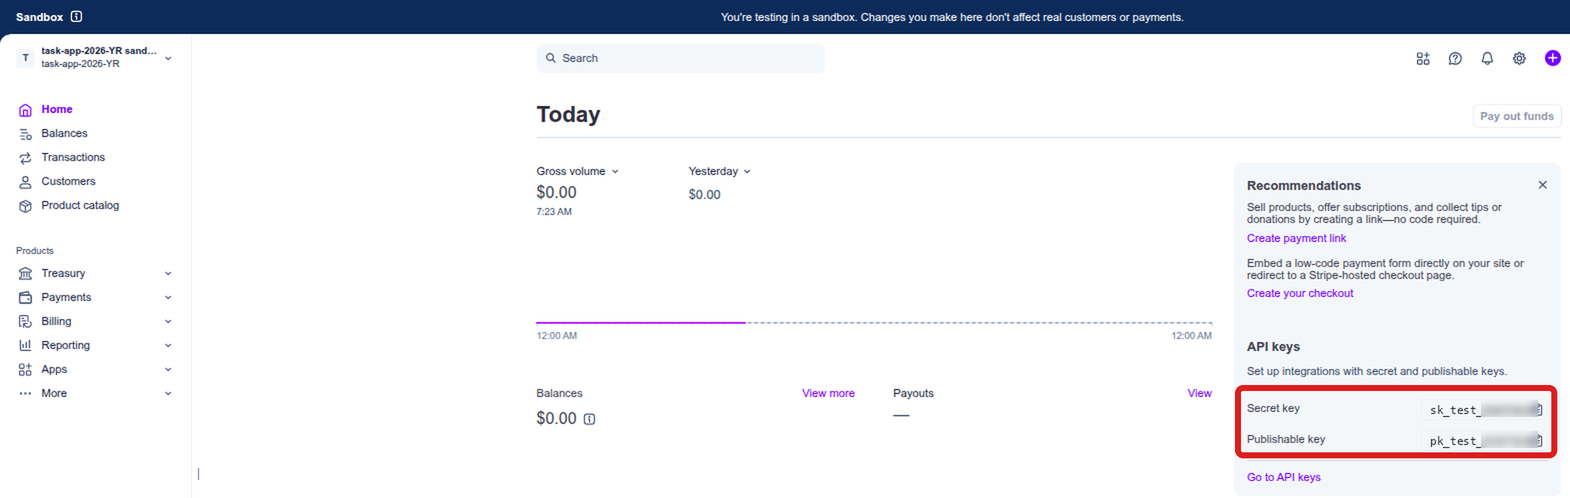
The API keys box, with a copy icon next to each key. In this picture the keys are blurred. Create the product. Click Product catalog in the left menu, then + Create product at the top right. In the Add a product panel:
- Name:
TaskMaster Premium - Under Pricing, Recurring and the Billing period Monthly are already selected.
- Amount:
10.00(USD).
Click Add product. Then copy the price’s ID: in the list, click TaskMaster Premium, and in its Pricing section, click the price ($10.00 USD). The page Price for TaskMaster Premium shows the ID (
price_...) at the top right, with a copy icon. Paste it into the worksheet’s Price ID of the monthly price, and typeTaskMaster Premiumas the Product name.Screenshots: the product and its price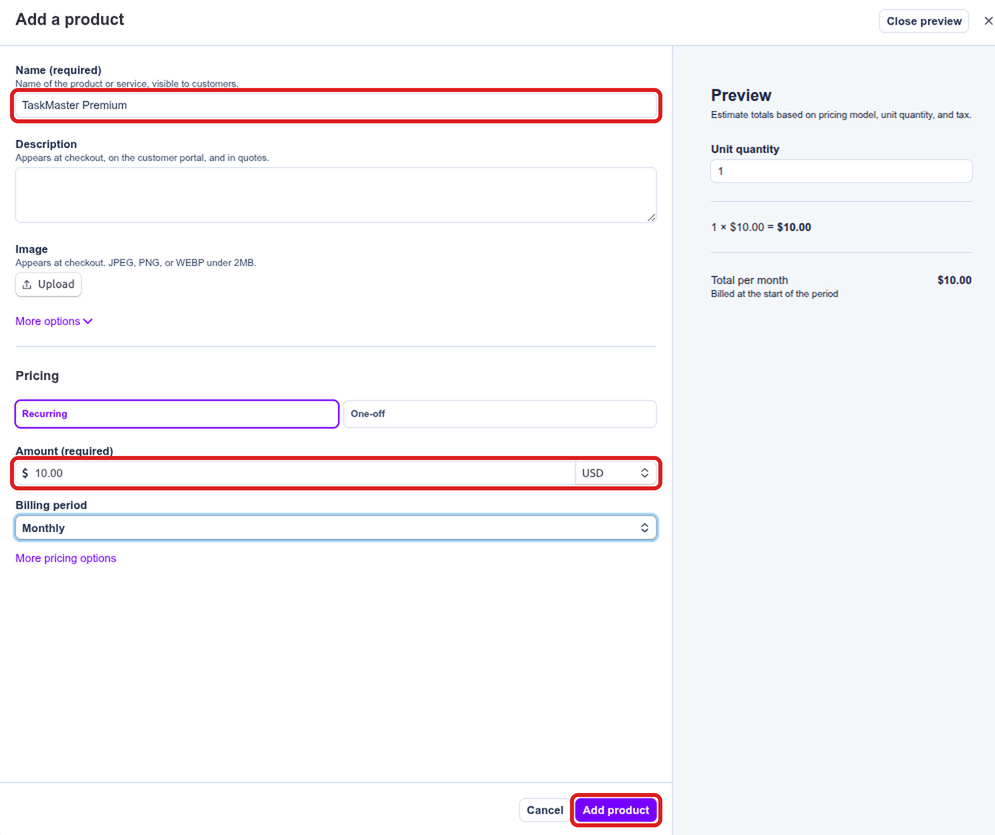
Add a product, filled in 
The product’s page: click the price 
The price’s page: its ID at the top right, with a copy icon - Name:
Set up the customer portal. The customer portal is a Stripe page where subscribers manage or cancel their subscription; the app’s Manage Subscription button opens it. Click the gear icon (Settings) at the top right. Under Product settings, click Billing, then Customer portal. Click Cancellations to open it, choose Cancel immediately (leave Prorate canceled subscriptions on), and click Save changes. A Portal configuration box showing Default appears at the top: the portal is ready.
Screenshots: the customer portal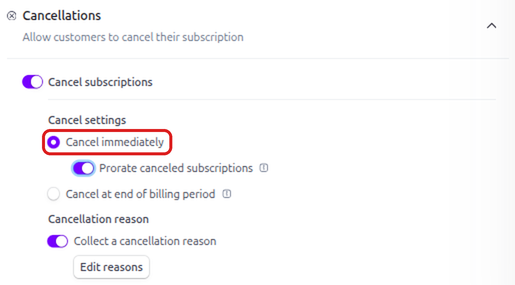
Cancellations: Cancel immediately 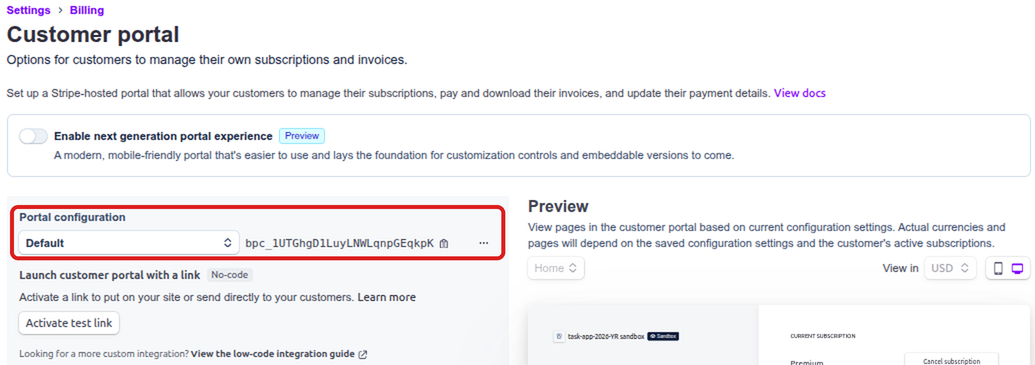
After Save changes: Portal configuration, Default Store the secret key in Supabase Vault. Supabase Vault is an encrypted store for secrets inside your database. The database uses the Stripe secret key from there to create a Stripe customer for each new user.
In the Supabase dashboard, open your project and click SQL Editor in the left menu (point at the icons to see their names). Paste the Vault line from the worksheet’s Commands sheet and click Run. Under Results, one row appears under create_secret: a long ID such as
1b11a542-d269-..., the stored secret’s ID. You don’t need to keep it.Then close the query’s tab: click the × next to Untitled query. A box Unsaved changes asks whether to keep editing. Click Discard changes: you lose nothing you need. Run already stored your key in Vault; “discard” only throws away the text in the editor, so that the line with your key isn’t kept in Supabase’s list of saved queries.
The Vault line is SQL, the language of databases, not a terminal command:
select vault.create_secret('sk_test_...', 'stripe');calls the functioncreate_secretin Supabase’svault, with two values in quotes: your secret key, and the name to store it under (stripe).Screenshots: Vault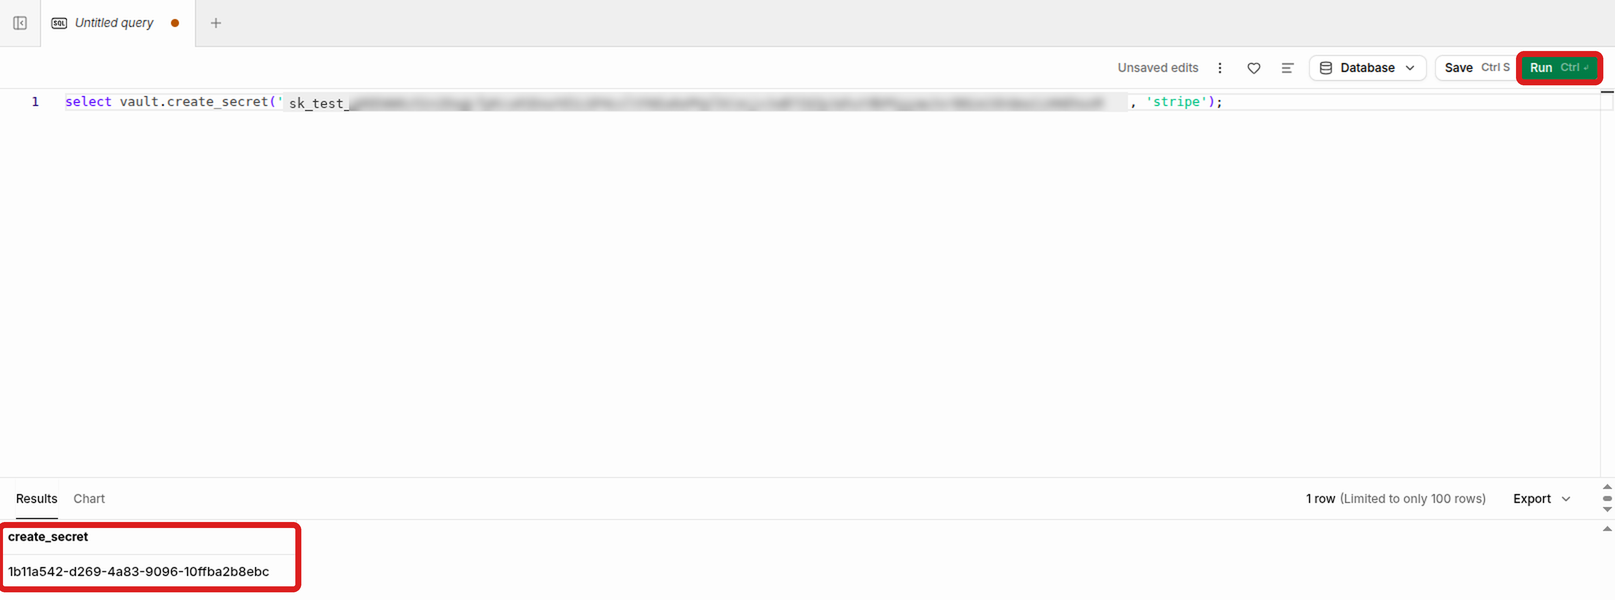
The Vault line after Run: one row, the new secret’s ID. In this picture the key is blurred. 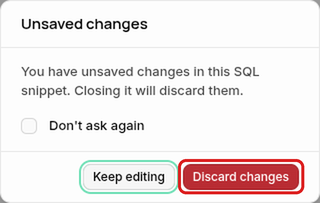
Closing the query’s tab: click Discard changes. Your key is already stored in Vault; this only clears the editor. Give the Edge Functions the Stripe key and the price ID. In VS Code’s terminal, first go into the app’s folder. It’s harmless if you’re already there; this just makes sure:
cd ~/projects/full-stack-demo-app/task-appThen copy the
STRIPE_SECRET_KEYline from the worksheet’s Commands sheet, paste it into the terminal, and pressEnter. It printsFinished supabase secrets set.Do the same with theSTRIPE_PRICE_IDline. (If it prints something else, see the box “Why? Why thecdfirst” in (E) step 6.)
The webhook comes in Step H, once the functions are deployed.
Step 8: Set Up Stripe puts the price ID in .env.local, but the app never reads it from there. The price ID must be a Supabase secret named STRIPE_PRICE_ID (step 6 above), and the Vault step (step 5) is missing from that chapter.