Part of the task-app setup for Classes 10–12. Work through the parts in order, doing every step yourself; Start here has the worksheet, the screenshot log, how to ask Claude when you’re stuck, and the list of all parts.
Supabase gives the app a PostgreSQL database, user logins, file storage and Edge Functions (small programs that run on Supabase’s servers; see Edge Functions).
Preview the front end. In VS Code’s terminal, first go into the app’s folder (harmless if you’re already there; this just makes sure):
cd ~/projects/full-stack-demo-app/task-app
Make your settings file, .env.local, as a copy of the example file that comes with the code:
cp .env.example .env.local
cp (“copy”) copies a file: first the file to copy, then the name of the copy. The example’s settings are placeholders; you fill in real ones in step 4. Then start the app:
The front end is the part of the app that runs in the browser: its pages, buttons and forms. npm run dev starts a development server, a program on your computer that hands those pages to your browser and reloads them whenever the code changes.
In the address http://localhost:3000, localhost means “this computer”, and 3000 is a port: a number that tells the computer which program should answer, because many programs can listen for connections at the same time. So the address means “the program on my own computer that is listening on port 3000”, which is the development server. Nobody else can open it. More in URLs, Domain Names, IP Addresses, and DNS.
Login doesn’t work yet because the front end has no back end to talk to: the database and user accounts come from Supabase, set up next.
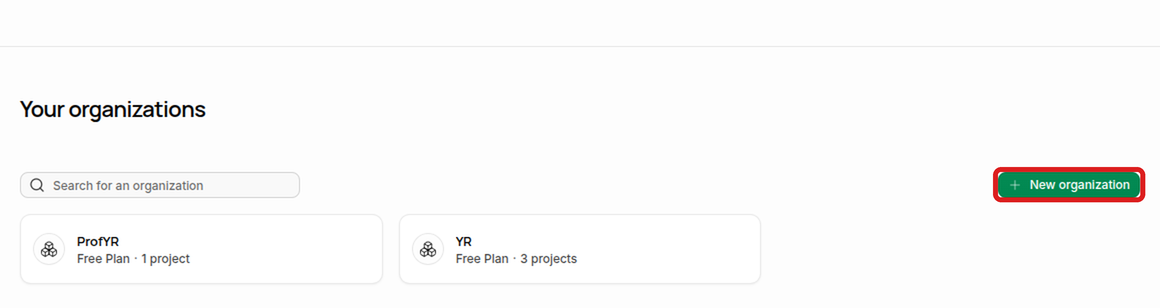
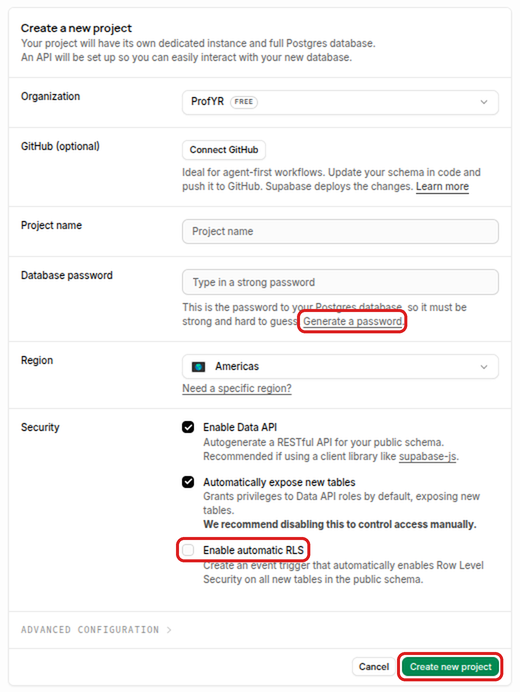
Create the project. At supabase.com, sign up (Continue with GitHub is easiest). Supabase first asks you to create an organization: give it any name, choose the Free plan, and create it. Then click New project and fill in the form:
Project name:task-app-2026- followed by your first name in lowercase, for example task-app-2026-maria. You’ll use the same name for your Google Cloud project (Step D) and your OpenAI project (Step E).
Database password: click Generate a password and copy the password into the worksheet right away.
Region: the area closest to you, for example Americas.
Security: leave Enable Data API and Automatically expose new tables on, and turn on Enable automatic RLS.
Click Create new project. It takes a couple of minutes.
Getting back to your Supabase project
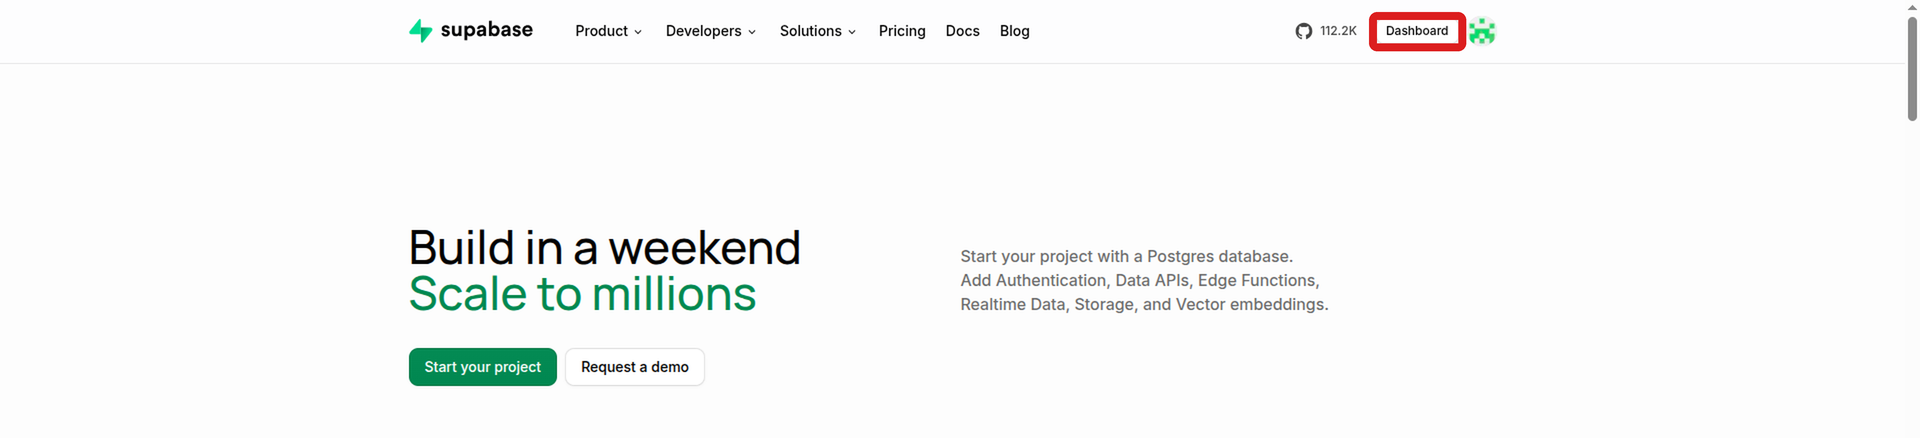
The dashboard’s addresses are long, so don’t try to remember them. Go to supabase.com and click Dashboard at the top right (sign in first if it says Sign in). You see your projects; click yours. Or bookmark your project’s home page once you’re there; the worksheet also has the address, in the row “Your project’s dashboard”.
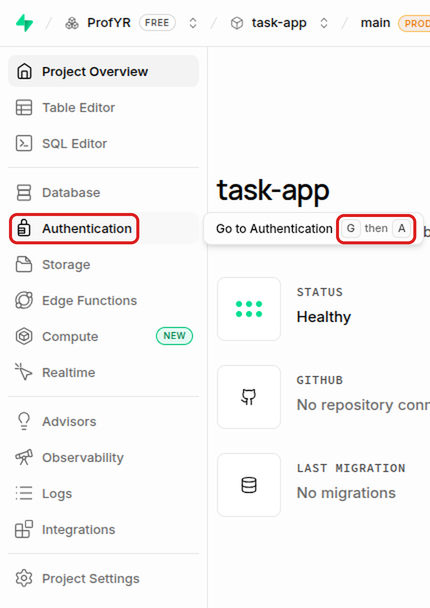
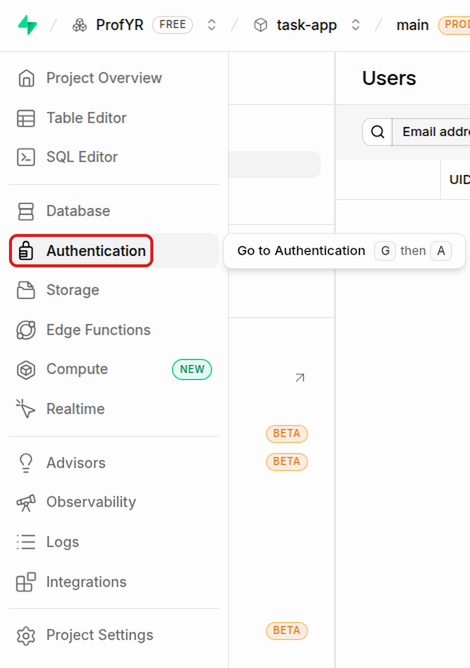
Inside the dashboard, hovering over a menu item shows a keyboard shortcut, such as G then A for Authentication: press G, let go, then press A.
Screenshots: the way back to the dashboard
supabase.com when you’re signed in: Dashboard at the top right
The icon menu, widened, with a shortcut shown for Authentication
Why? What are Supabase, an organization and a project?
Supabase is a back end as a service: instead of renting a server and installing a database on it, you get a ready-made back end on Supabase’s computers, with a database (PostgreSQL) for the app’s data, user accounts (sign-up and login), file storage for uploaded images, and Edge Functions, small programs of your own that run on Supabase’s servers. See What Happens on the Server: Back Ends, Databases, and APIs.
A project is one complete back end for one app: its own database, its own users, its own keys and its own web address. An organization holds projects, like a company holds departments: it has the billing plan and the team members who may work on its projects. The free plan allows only a few active projects, so if you used Supabase before, you may have to pause or delete an old project.
Why? The database password and the region
The database password is the password of the PostgreSQL database itself. The app never uses it: the app talks to Supabase with API keys (step 3). You need the password only for tools that connect to the database directly, such as the Supabase CLI when it creates your tables in Step G. Anyone who has it can read and change all of your data, so keep it only in the worksheet.
The region is where Supabase’s data center for your project is. Data takes time to travel, so a region close to your users makes the app faster. (Companies also choose regions for legal reasons, for example to keep Europeans’ data in Europe.) “Americas” lets Supabase pick a data center in the Americas.
Why? The three Security settings (Data API, exposed tables, RLS)
The Data API is a web API that Supabase creates for your database automatically. The app’s code in the browser reads and changes tables by sending web requests to your project’s address, instead of connecting to the database directly. Without it, the app couldn’t reach its data.
Automatically expose new tables gives the Data API permission to use each new table. The app’s database setup (its migrations, Step G) creates its tables but doesn’t grant those permissions itself; it relies on this setting. With it off, every request would fail with “permission denied”. (Supabase recommends turning it off so that you grant access to each table yourself; this older code wasn’t written that way.)
Row Level Security (RLS) is a set of rules, stored in the database, about which rows each user may see or change, for example “a user sees only their own tasks”. It matters because the Data API is open to anyone who has the publishable key, and that key is inside the app’s web pages, where anyone can read it. RLS is what keeps one user out of another user’s data. Enable automatic RLS turns RLS on for every new table, so a table someone forgets to protect is locked (it looks empty) instead of open to everyone. The app’s own tables have RLS rules already; see Step 9: Set Up Supabase Database.
Screenshots: organizations and the new project form
Your organizations. Each organization holds projects. (In these pictures the project is named task-app; yours is named task-app-2026- and your first name.)
The “Create a new project” form
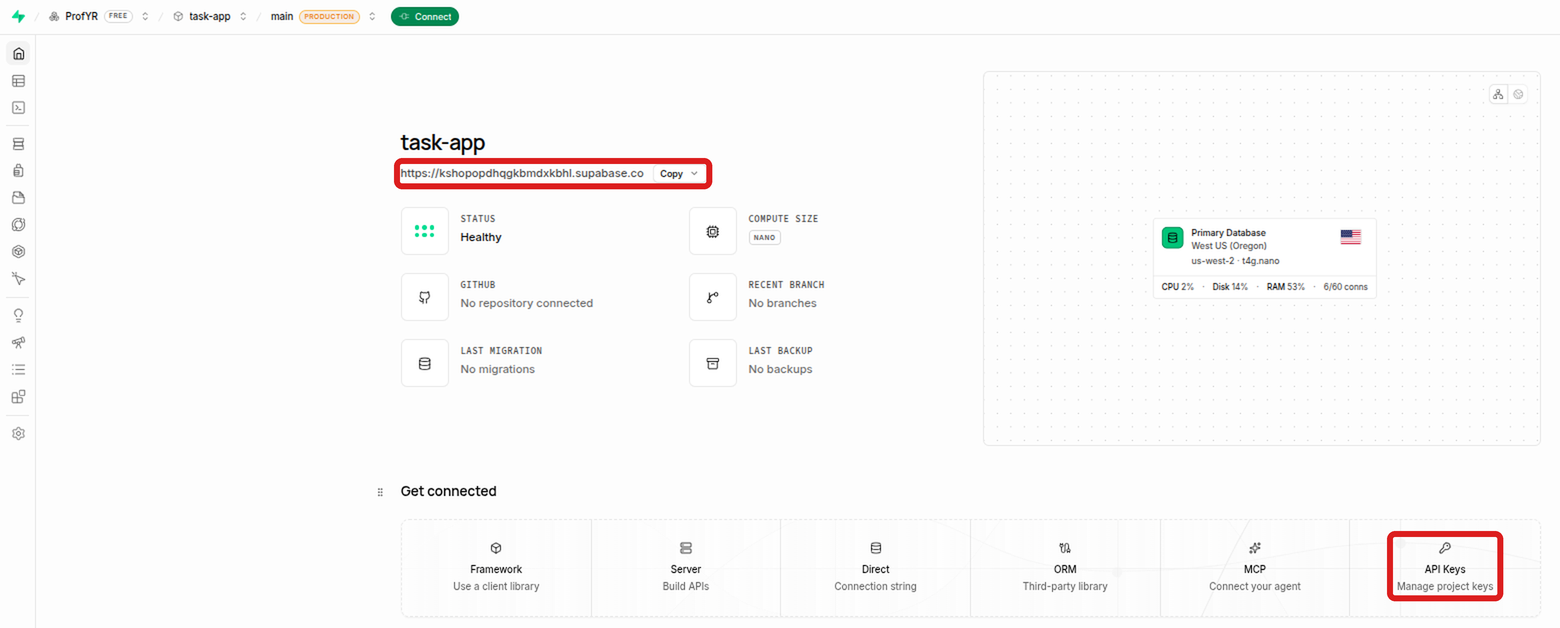
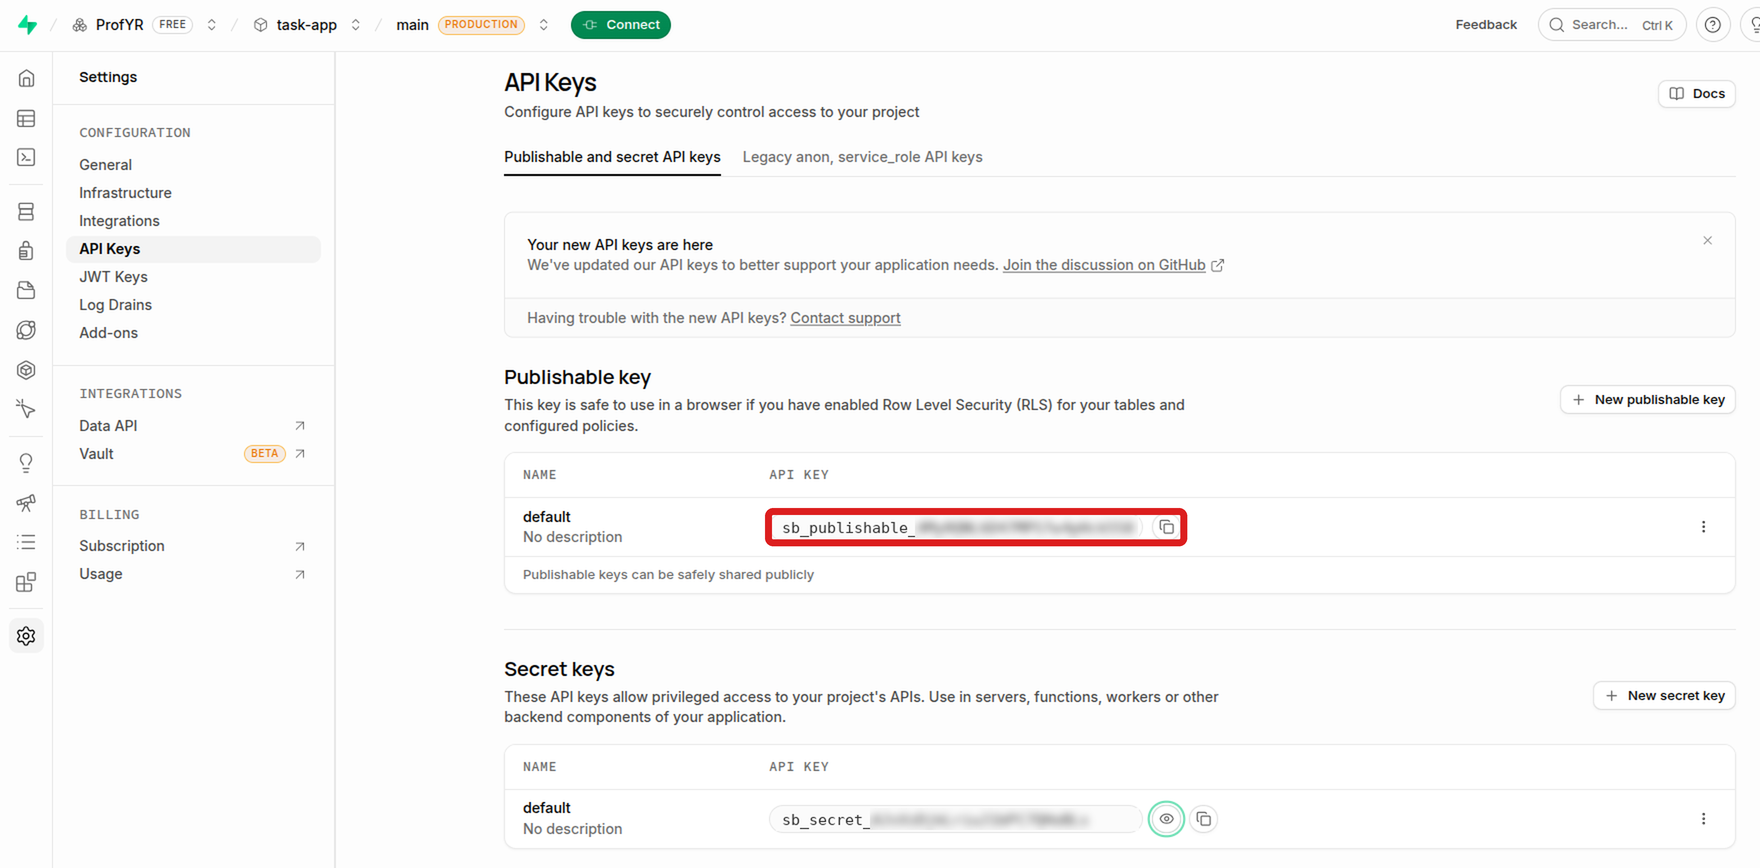
Record your project ref, URL and publishable key in the worksheet. The project’s home page shows its URL (with a Copy button); the ref is the part before .supabase.co. For the key, click the API Keys card under Get connected, or go to Project Settings > API Keys. The publishable key starts with sb_publishable_; click the copy icon next to it, because the page shows only its start. (Ignore the Legacy tab: the tutorial video uses an older “anon” key from there, but this app uses the publishable key.) If a Preview box appears at the bottom right of the dashboard, close it with its ×.
Why? The URL, the ref and the two kinds of keys
Your project’s URL (https://REF.supabase.co) is the web address of your back end: the app sends its requests there. The ref is the project’s unique ID, the 20 letters at the start of that address. The CLI uses it to know which project you mean, and the worksheet uses it to build other addresses you need later (for Google and Stripe).
An API key tells Supabase which project a request belongs to and how much it may do. The publishable key may appear in web pages: it only allows what the RLS rules allow. The secret key skips all RLS rules, so it must never leave the server side. See APIs, API Keys, and Third-Party Services.
Screenshots: the project’s home page and the API Keys page
The project’s home page: the URL under the name, and the API Keys card under Get connected
The API Keys page (the keys are hidden in this picture)
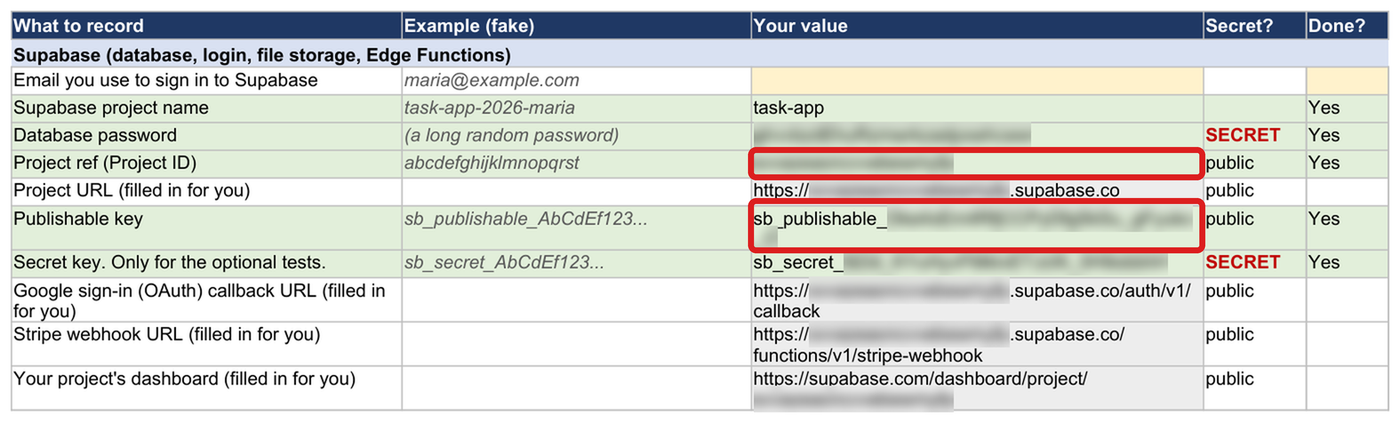
The worksheet so far: the Supabase rows
The instructor’s worksheet after this step. In the book, the private values are blurred; yours shows your real values. The rows marked “filled in for you” fill themselves in once you type the project ref.
The Supabase rows of the worksheet’s My Info sheet
Fill in .env.local. In VS Code’s file list, open task-app/.env.local and replace the two values with the two .env.local lines from the worksheet’s Commands sheet. Save the file.
Why? What is .env.local?
The app’s code needs your project’s URL and publishable key, but they differ for every student, so they can’t be written into the code that everyone shares. Instead the app reads them when it starts from .env.local, a settings file on your computer that Git never uploads (the project’s .gitignore file excludes it). The notes at the top of the file explain it line by line. See Environment Variables and .gitignore and Keeping Secrets Out of Git.
Connect the CLI. You run the Supabase CLI with npx supabase ..., always in VS Code’s terminal in the task-app folder: before the first npx supabase command, type cd ~/projects/full-stack-demo-app/task-app and press Enter (Where to type commands).
Why? npx, package.json, and why the folder matters
The Supabase CLI is one of the app’s devDependencies: the tools listed in package.json that you need while building the app, not while it runs (dependencies vs. devDependencies). package.json asks for version ^2.121.0, meaning 2.121.0 or any later 2.x version, and package-lock.json records the exact version that npm install put into the node_modules folder (Step B5). npx runs a program from that folder.
So npx supabase must run in the task-app folder. Anywhere else, npx doesn’t find the project’s copy, and the CLI also reads which Supabase project to change from the folder you’re in (npx supabase link, below, writes that down). If a command prints one of these, you were in the wrong folder; cd into task-app and run it again:
“Need to install the following packages: supabase… Ok to proceed?” (answer n);
“Cannot find project ref. Have you run supabase link?” (nothing was changed);
“A new version of Supabase CLI is available” (another copy ran, from somewhere else). More in Using Supabase CLI via npx.
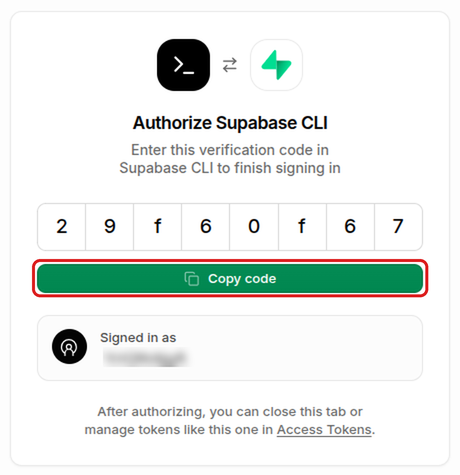
Log in. In VS Code’s terminal, in the task-app folder, type npx supabase login. It says “Press Enter to open browser”. Press Enter. If no browser opens, hold Ctrl (Cmd on a Mac) and click the login link it prints. The browser page shows a verification code: click Copy code, paste it into the terminal, and press Enter. The terminal says “You are now logged in.”
Link the folder. Copy the npx supabase link --project-ref ... line from the worksheet’s Commands sheet (it has your project ref in it), paste it into the terminal, and press Enter. If it asks for the database password, paste it from your worksheet.
Skip the README’s supabase init: the project already has its supabase/config.toml file, so init fails. Don’t run npx supabase start: that runs Supabase locally and needs Docker (see the deeper dive at the end). See Step 5a: Supabase CLI command.
Why? What are the CLI, npx, login and link?
A CLI (command-line interface) is a program you control by typing commands instead of clicking. The Supabase CLI does from the terminal what would take many clicks on the website, and it can send the project’s files (database setup, Edge Functions) to Supabase.
npx runs a program that comes with the project’s packages (in node_modules), so everyone uses the version the project lists in package.json. supabase is the program, and login and link are its commands:
login proves to Supabase who you are. The browser page and the verification code connect your sign-in on the website to this terminal. The CLI then keeps a token (a long secret string, like a pass) on your computer, so you stay logged in.
link remembers which project this folder belongs to (in the folder supabase/.temp, which Git ignores). Later commands, such as creating the tables or uploading the Edge Functions, then go to your project. The option --project-ref names the project, followed by your ref.
Screenshots: logging in to the Supabase CLI
The terminal, waiting for the verification code
The browser page with the verification code
The terminal after pasting the code
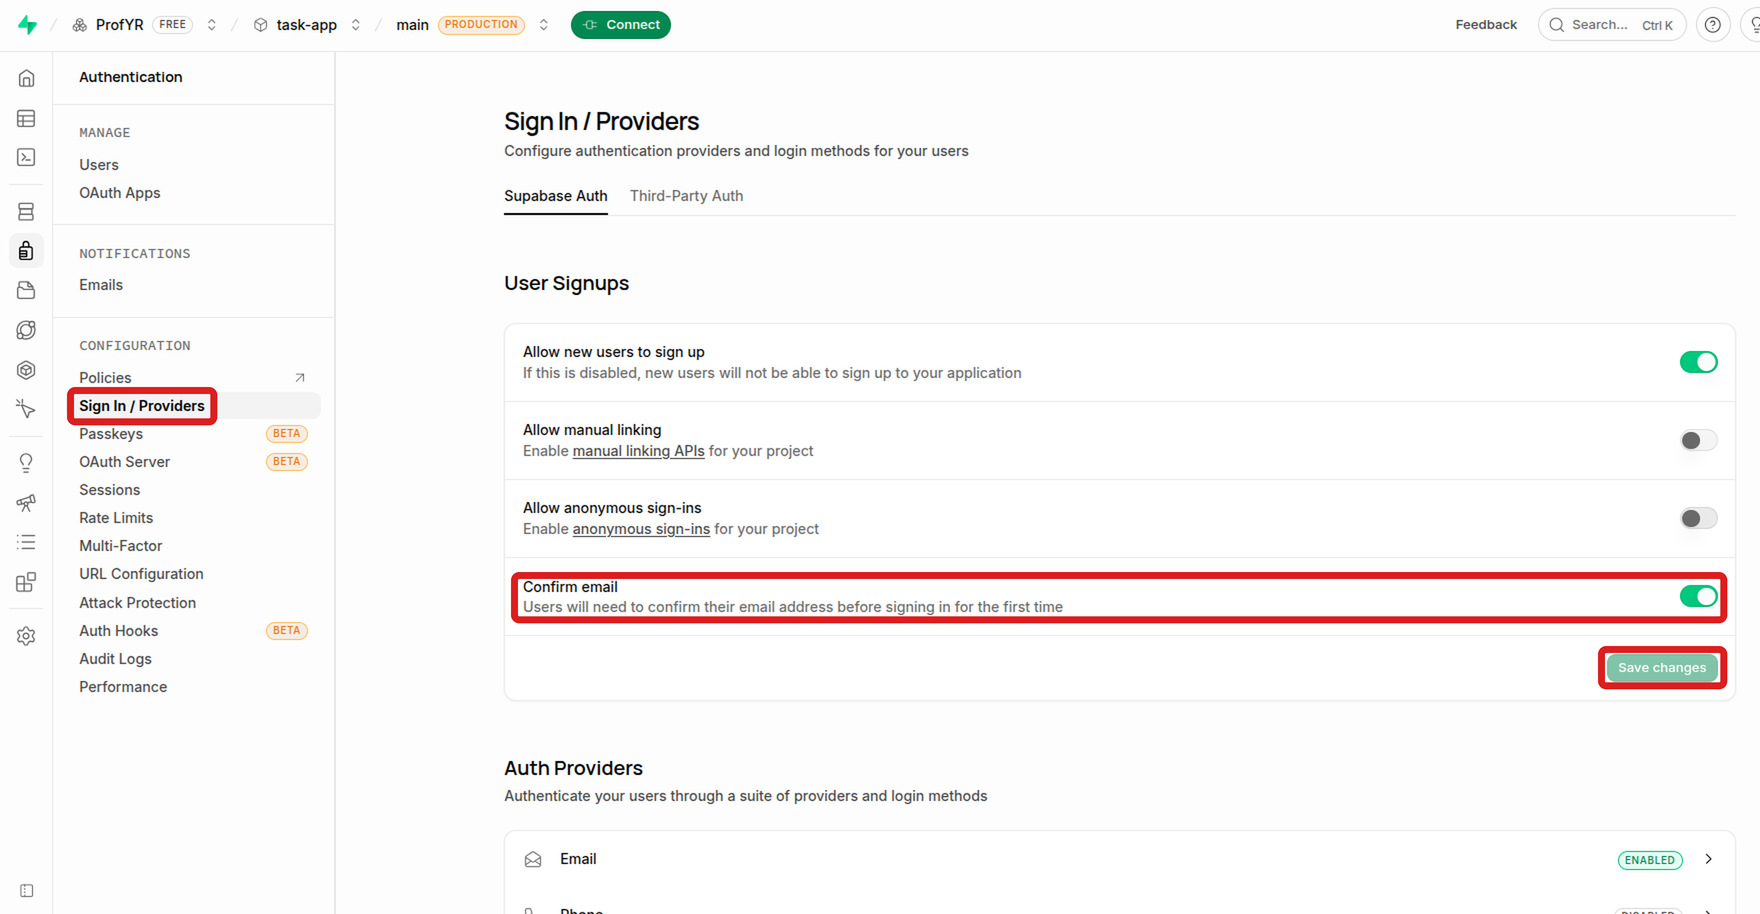
Two auth settings in the Supabase dashboard. The dashboard has two menus on the left: a narrow column of icons (hold the mouse over it to see their names), and next to it a menu for the part you’re in. In the icon column, click Authentication. Then move the mouse away from the icons: the second menu, titled Authentication, appears. Under CONFIGURATION:
Sign In / Providers, in the User Signups section: turn off Confirm email and click Save changes.
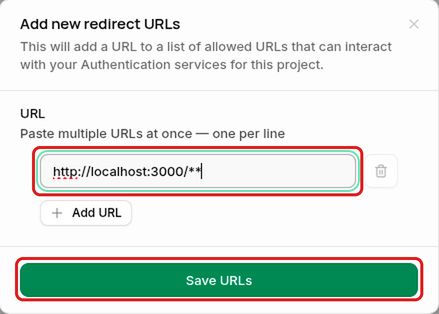
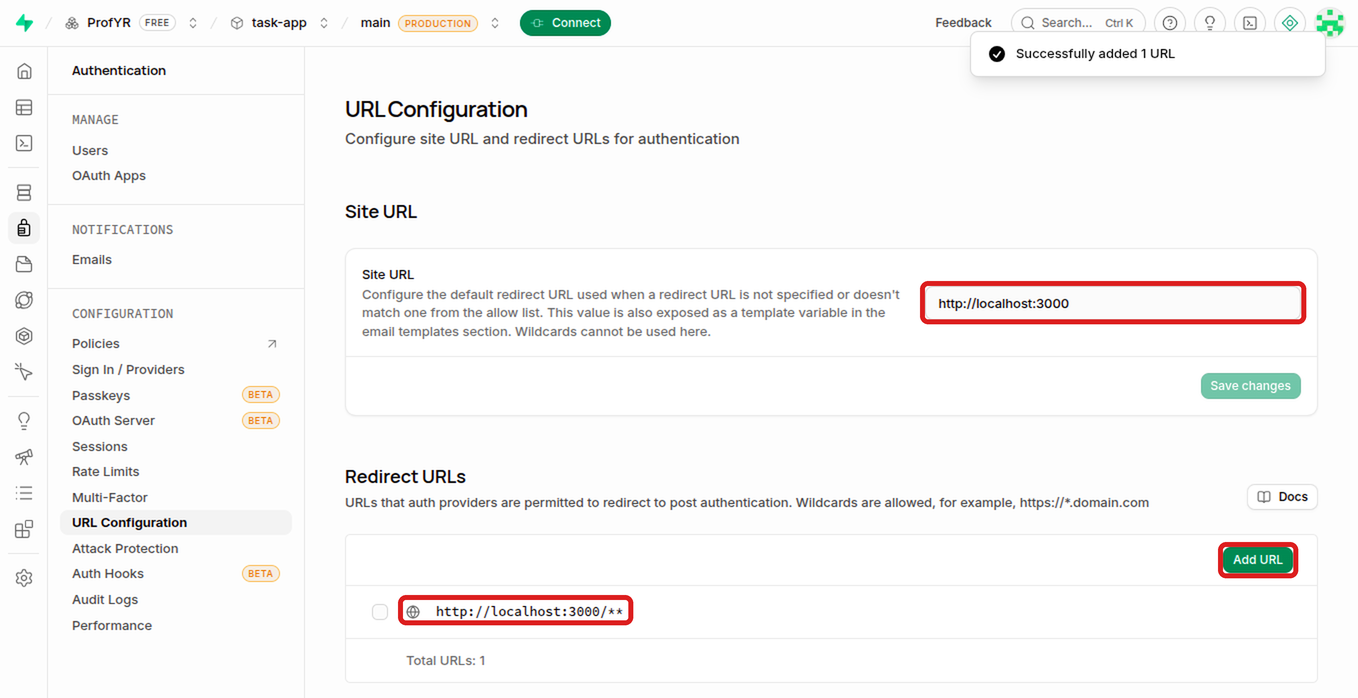
URL Configuration: check that Site URL is http://localhost:3000 (a new project already has it). Under Redirect URLs, click Add URL, type http://localhost:3000/**, and click Save URLs.
Why? Confirm email
Authentication (“auth”) means checking who a user is, usually by email and password, or with an account they already have, such as Google. With Confirm email on, Supabase emails every new user a link, and the account works only after they click it. That proves the address belongs to them. While you test with made-up accounts, those emails would never arrive, so you turn it off. A real app would turn it back on.
Why? Site URL, redirect URLs and the ** wildcard
When someone signs in with Google (Step D), their browser travels: from your app to Google, from Google to Supabase, and then back to your app. Supabase needs to know the app’s address for that last trip. The Site URL is the default address. The redirect URLs are a list of other addresses Supabase may send users back to. (http://localhost:3000 is your app on your own computer; if the parts of such an address are new, see Anatomy of a URL and localhost and 127.0.0.1.) Only listed addresses are allowed, so that nobody can trick Supabase into sending a freshly signed-in user, with their login token, to a different website.
This app sends users back to http://localhost:3000/dashboard, which is not the Site URL, so it must be on the list. ** is a wildcard: it matches any characters, including /, so the one entry http://localhost:3000/** allows every page of the app on your computer. (A single * would stop at the next /.) In Step H you add the app’s address on Vercel the same way.
Screenshots: the dashboard’s menus and the sign-in settings
The icon column, widened while the mouse is over it
Authentication > Sign In / Providers, with Confirm email still on
Adding the redirect URL
URL Configuration after adding it
Don’t sign in to the app yet
Every new user automatically gets a Stripe customer record. Signing up before Step F is finished fails.